
Yahoooo… now I will be able to go en plein air with less mess. Great idea, but (there is always a but, hahaha) did you also make your 2 pochades? If so, could you also share the plans for them? They are a great size.
I admitted that I thought of doing the submersion in water, but on discussing it with a paint vendor (Natural Pigments), there were potential issues:
Water can introduce impurities such as dust, microorganisms, or dissolved minerals, which may affect the paint’s consistency, adhesion, and overall durability., and that can cause interference with the drying process, possibly leading to unexpected textural changes or weakened paint film stability.
Maintaining clean water is essential to minimize this risk.
Palette Material Suitability: Not all palettes are suitable for water submersion. This isn’t an issue in your case.
The biggest potential issue (for me, at least) was water absorption is actually possible. Although oil paint repels water, prolonged submersion can lead to water intrusion at the paint’s surface, which can alter the paint’s drying characteristics and consistency, potentially leading to adhesion issues once applied to a surface.
They recommended the cotton ball with clove oil, but I won’t do that either after it was reported that it had spoiled someone’s painting. They might not have used a cotton ball (they might have just used a lot in a cup or something), but it was enough for me to avoid it.
I personally tried freezing, but I don’t think it worked well, or even at all, and there was condensation as it warmed to room temperature.
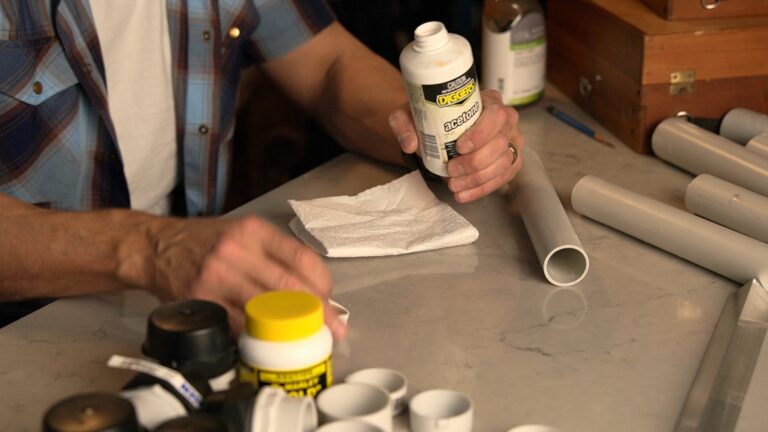
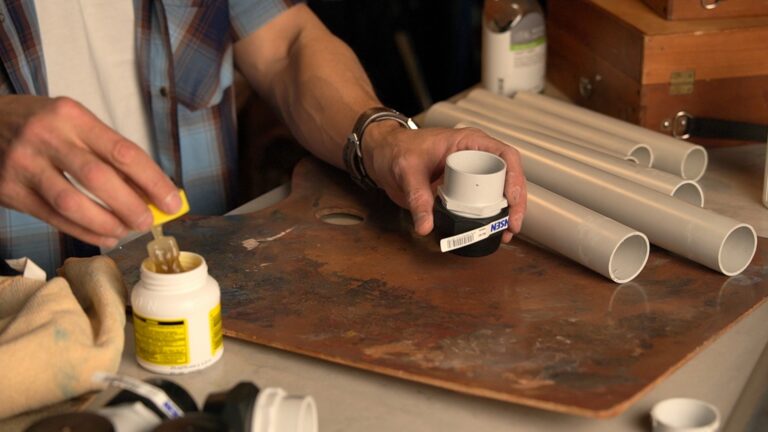
Currently, not that it it lasts for long, but I think it lasts a bit longer, I use a sealed pallets which is plastic, and has an O-ring (not Masterson, a cheaper but better manufacturing design for tightness), and I add a few oxygen absorber packages (bought in quantity) on Temu, since it was cheaper than local suppliers and exactly the same maker.
It’s not perfect, because there’s a lot of air to draw in, but zim not going over the top and buying a vacuum pump for the sealed pallet; although, I did consider various manual valve and hsbd pump ideas. I just thought I try the O2 absorbers first.
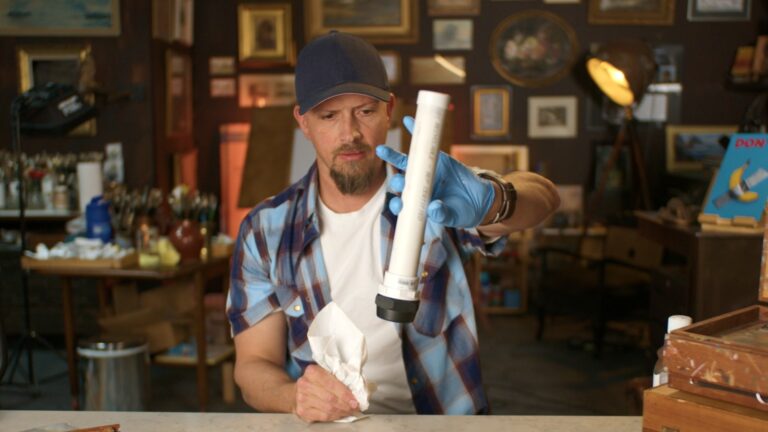
Now, I realize this is impractical for your purpose since you can’t lug around a sealed pallet, but your idea of a sealed tube coil pled with a check valve and a brake fluid style of pump stored in your car, could be used to pump air out of your PVC tube if it was sealed well.
Anyway, just a thought to consider, if the water causes problems.
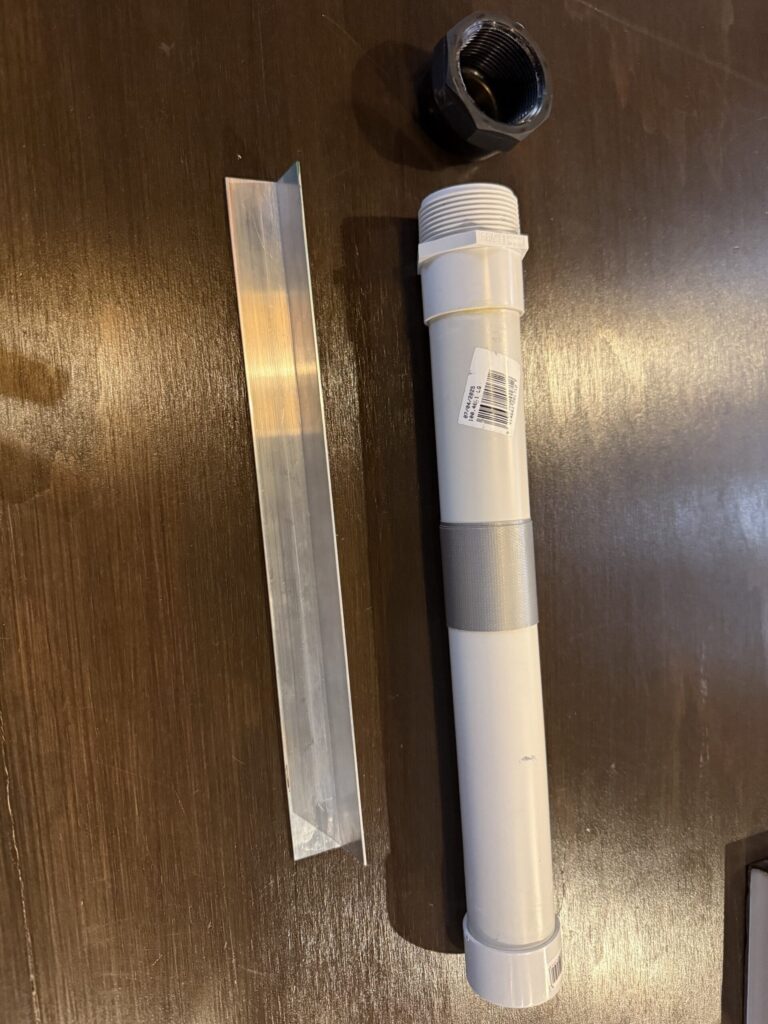
Sorry, mechanical engineer thinking about this, love the idea of the paint saver tube I will make one!! I wonder if you drilled a hole in the top of the cap or the capped end and glued in a one way vacuum check valve (some are pretty cheap on Amazon, https://a.co/d/aq782tH) and just used your mouth to suck out the air if it would extend the life of the paint. A human can generate a max sucking pressure of about -6 to -8psi and if you are starting from sea level at 14.7psi that could get you maybe to 7psi and the partial pressure (concentration) of oxygen is 2 times less than at sea level, so maybe that makes paint last twice as long (plus the air volume in a sealed tube is much less than sitting out in free air and after a while the number of oxygen molecules left in the tube would react with the paint and do some oxidation (that’s how the oil paint “drys”, the alkyds oxidize and causes the molecules of the paint to cross link into a rigid web). If you are at higher elevation say at 4500ft the pressure starts near 12 psi and if you could remove 7psi from the tube it gets you near to three times less oxygen in the tube to react. If you used one of those hand pump vacuum pumps like those for bleeding brakes, they can generate a negative pressure of about 14.5psi so if you used that on the tube after your session it would be removing most all of the oxygen from the tube (those one way valves can hold up to 43psi of vacuum, so the pump cant break the valve). The paint should last a really long time theoretically, and then you don’t have to worry about water interactions with the paint.
3 responses
Yahoooo… now I will be able to go en plein air with less mess. Great idea, but (there is always a but, hahaha) did you also make your 2 pochades? If so, could you also share the plans for them? They are a great size.
I admitted that I thought of doing the submersion in water, but on discussing it with a paint vendor (Natural Pigments), there were potential issues:
Water can introduce impurities such as dust, microorganisms, or dissolved minerals, which may affect the paint’s consistency, adhesion, and overall durability., and that can cause interference with the drying process, possibly leading to unexpected textural changes or weakened paint film stability.
Maintaining clean water is essential to minimize this risk.
Palette Material Suitability: Not all palettes are suitable for water submersion. This isn’t an issue in your case.
The biggest potential issue (for me, at least) was water absorption is actually possible. Although oil paint repels water, prolonged submersion can lead to water intrusion at the paint’s surface, which can alter the paint’s drying characteristics and consistency, potentially leading to adhesion issues once applied to a surface.
They recommended the cotton ball with clove oil, but I won’t do that either after it was reported that it had spoiled someone’s painting. They might not have used a cotton ball (they might have just used a lot in a cup or something), but it was enough for me to avoid it.
I personally tried freezing, but I don’t think it worked well, or even at all, and there was condensation as it warmed to room temperature.
Currently, not that it it lasts for long, but I think it lasts a bit longer, I use a sealed pallets which is plastic, and has an O-ring (not Masterson, a cheaper but better manufacturing design for tightness), and I add a few oxygen absorber packages (bought in quantity) on Temu, since it was cheaper than local suppliers and exactly the same maker.
It’s not perfect, because there’s a lot of air to draw in, but zim not going over the top and buying a vacuum pump for the sealed pallet; although, I did consider various manual valve and hsbd pump ideas. I just thought I try the O2 absorbers first.
Now, I realize this is impractical for your purpose since you can’t lug around a sealed pallet, but your idea of a sealed tube coil pled with a check valve and a brake fluid style of pump stored in your car, could be used to pump air out of your PVC tube if it was sealed well.
Anyway, just a thought to consider, if the water causes problems.
Sorry, mechanical engineer thinking about this, love the idea of the paint saver tube I will make one!! I wonder if you drilled a hole in the top of the cap or the capped end and glued in a one way vacuum check valve (some are pretty cheap on Amazon, https://a.co/d/aq782tH) and just used your mouth to suck out the air if it would extend the life of the paint. A human can generate a max sucking pressure of about -6 to -8psi and if you are starting from sea level at 14.7psi that could get you maybe to 7psi and the partial pressure (concentration) of oxygen is 2 times less than at sea level, so maybe that makes paint last twice as long (plus the air volume in a sealed tube is much less than sitting out in free air and after a while the number of oxygen molecules left in the tube would react with the paint and do some oxidation (that’s how the oil paint “drys”, the alkyds oxidize and causes the molecules of the paint to cross link into a rigid web). If you are at higher elevation say at 4500ft the pressure starts near 12 psi and if you could remove 7psi from the tube it gets you near to three times less oxygen in the tube to react. If you used one of those hand pump vacuum pumps like those for bleeding brakes, they can generate a negative pressure of about 14.5psi so if you used that on the tube after your session it would be removing most all of the oxygen from the tube (those one way valves can hold up to 43psi of vacuum, so the pump cant break the valve). The paint should last a really long time theoretically, and then you don’t have to worry about water interactions with the paint.